FIXED INSTALLATIONS
A poorly executed professional audio cabling installation in Málaga may look fine on opening day. The problems appear three months later, when an impossible-to-eliminate hum develops, no one understands the audio rack, or an underspecified 100-volt line leaves the furthest speakers barely audible. Fixing it then means dismantling equipment, pulling new cables and paying for work that was never budgeted.
This guide is for venue owners, installers, architects and construction or maintenance managers who want to get the job right from the start. It avoids unnecessary jargon without overlooking the essentials.
6 STEPS
FROM ROUTING TO DOCUMENTATION
100 V
DISTRIBUTED PA SPEAKER LINE
≈80 %
RECOMMENDED MAXIMUM AMPLIFIER LOAD
01 · FIXED INSTALLATIONS
1. Step 1: plan your cable routes before pulling any cable
The most common and expensive mistake in any commercial sound installation is improvising cable routes as the job progresses.
Before chasing walls or installing trunking, decide:
- Where the audio rack will be located (ideally somewhere central, accessible and ventilated)
- How many sound zones the premises will have, and whether they need independent control (which determines whether a single amplifier is sufficient or whether a multi-zone amplifier or DSP processoris needed)
- Which distribution system you will use: conventional audio signals or a 100-volt speaker line
- Where the loudspeakers will go, along with microphone connections and audio inputs
- Where conduits and cable runs will pass, keeping signal, speaker and mains cables separate from the outset
- How the rack will be powered: a dedicated circuit from the distribution board, with appropriate protection, is recommended
- Whether the venue requires a sound limiter-recorder under its licence: it must be integrated into the rack's signal chain so that all playback passes through it
With this plan in place, cabling design becomes straightforward. Without it, every improvised decision can create future problems.
02 · FIXED INSTALLATIONS
2. Step 2: choose balanced or unbalanced audio cabling correctly
This is an area where a lack of understanding causes many mistakes.
Professional balanced audio cabling (two signal conductors plus shield, with XLR or TRS jack connectors or wired directly to terminals) is standard in professional fixed installations for a very specific reason: it rejects electromagnetic interference picked up along the cable run. Noise reaching both conductors equally is cancelled by the balanced input. Both the source output and destination input must be balanced for this to work. In a venue with LED lighting, dimmers or nearby electrical wiring, this is a necessity rather than a luxury.
Unbalanced cabling (RCA or two-conductor TS jack) has its place over short distances between consumer devices. Using it over long runs often leads to hum, noise and interference. When a source only has an unbalanced output, such as a computer or television, convert the signal to balanced close to the source using a DI box or converter.
Practical rule: in a fixed installation, audio signal runs longer than a few metres (around 3–4 m as a guide) should normally be balanced from end to end using good-quality shielded cable. In public-access premises, consider halogen-free, low-smoke cable sheathing consistent with the fire-safety requirements applied to electrical cabling under Spain's Low Voltage Electrotechnical Regulation (REBT).

03 · FIXED INSTALLATIONS
3. Step 3: when to use 100-volt speaker lines and how to size them
The 100-volt speaker line is commonly used for distributed public-address installations with many loudspeakers: cafés, restaurants, hotels, shops and building common areas.
Its advantage is straightforward: transmitting power at higher voltage and lower current allows multiple speakers to be connected in parallel over long cable runs with less loss than a conventional low-impedance (4–8 ohm) system.
However, it must be designed correctly:
- Each speaker needs a line transformer with the correct power tap selected
- As good practice, the total power-tap rating of all speakers should not exceed approximately 80% of the amplifier's rated output, leaving headroom for transformer tolerances and cable losses
- Cable cross-section depends on power and run length: 1.5 mm² is often sufficient for normal commercial runs, while 2.5 mm² may be appropriate for longer runs or heavier loads
- 100-volt line cables must be separated from low-level signal cables (microphones, consoles) to minimise interference
- A 100-volt line operates at 100 V RMS, with higher peaks: make joints in suitable junction boxes using protected terminals, never exposed conductors
Mixing systems without understanding them—such as connecting a low-impedance speaker without a transformer to a 100 V output—is a frequent cause of damage and poor performance in hospitality installations.
04 · FIXED INSTALLATIONS
4. Step 4: organise, protect and ventilate the audio rack from day one
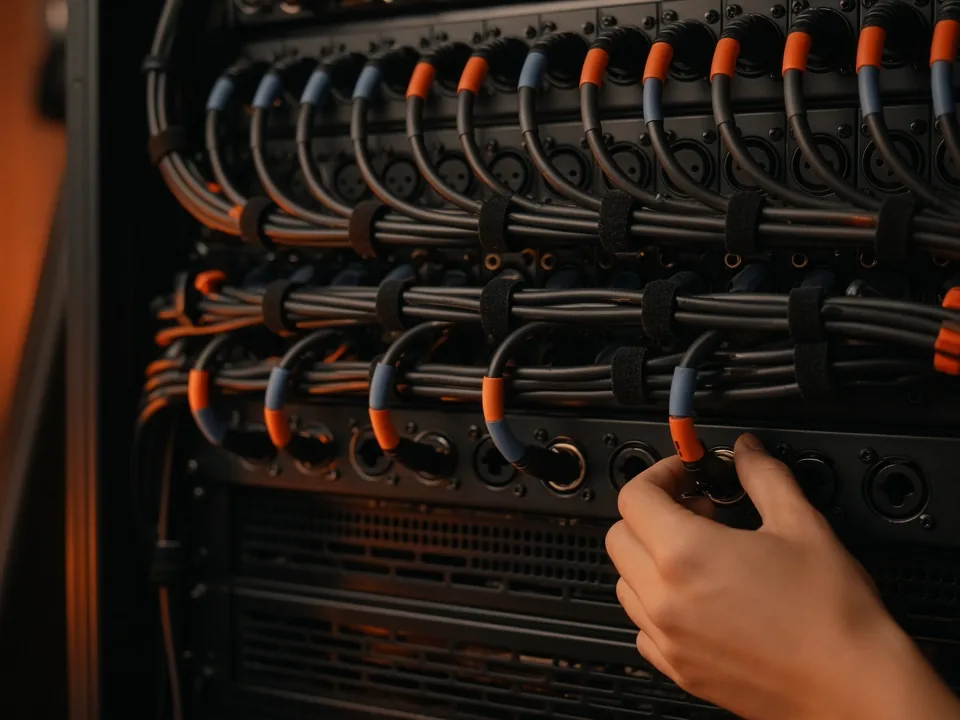
A well-organised audio rack makes the difference between an installation anyone can maintain and a maze only its original installer understands.
Basic good practice:
- Label every cable before connecting it, not afterwards
- Use patch panels to make connections accessible without moving equipment
- Respect the ventilation requirements specified by each manufacturer. Many amplifiers draw air in through the front and exhaust it at the rear, so airflow must remain unobstructed. A rack built into a closed cabinet may need forced ventilation. Excessive heat is a common cause of power amplifier failures
- Run mains power cables along one side of the rack and signal cables along the other; if they cross, do so at right angles
- Protect equipment against surges (at the electrical board and, where appropriate, with protected rack power distribution and sequenced power-up), and add a UPS where the system is critical, such as a PA system or networked DSP
A disorganised rack not only complicates servicing; it creates technical problems that can be difficult to diagnose.
Regulations: Electrical components of the installation—including rack power circuits, breakers, RCDs, earthing and cable routes—must comply with Spain's Low Voltage Electrotechnical Regulation (REBT) and be installed by an appropriately authorised electrical contractor.
05 · FIXED INSTALLATIONS
5. Step 5: prevent ground-loop hum at the design stage
Professional Ground-loop hum (the persistent low-frequency 50 Hz buzz and its harmonics) is one of the most common and frustrating problems in fixed audio installations, often becoming noticeable at the worst possible moment.
The most common cause is a ground loop: a difference in electrical potential between equipment grounds that drives current through the shields of connected signal cables. Long unbalanced runs and improperly terminated shields can also contribute.
How to prevent it during design:
- All equipment in the rack should share the same protective earth reference and ideally be powered from the same circuit
- Use Audio isolation transformers on problem inputs such as computers, televisions connected to aerial systems and external players
- In larger installations, consider a star-grounding arrangement where equipment grounds converge at a common point rather than being daisy-chained
Safety first: never defeat the protective earth on a device (for example by removing the earth pin or using an unearthed adapter) to eliminate hum. This creates a serious electrical hazard and conflicts with electrical safety rules. Address the audio signal instead, using an isolation transformer, an appropriate ground lift on a DI box or audio device, or a correctly engineered one-end shield termination for a balanced connection.
Troubleshooting ground noise after an installation is finished can take hours. Prevention is worth the effort.

06 · FIXED INSTALLATIONS
6. Step 6: document the installation
This step is omitted far too often, and it is the one people miss most when repairs or modifications are needed a year later.
The minimum documentation for a commercial sound installation should include:
- Cable route drawings with each line clearly identified
- An equipment list with models, serial numbers and settings
- Connection diagrams for the audio rack
- DSP processor settings (equalisation, limits and zone delays), with backup copies of configuration files
Documentation is part of the project, not an optional extra. Without it, the installation is not finished.
07 · FIXED INSTALLATIONS
7. Frequently asked questions about professional audio cabling
Why is there a hum in my venue's sound system?
In many cases it is ground-loop noise caused by equipment with different earth references or long unbalanced signal runs. Resolve it by using a common supply where appropriate, balanced connections and audio isolation transformers. Never remove an equipment safety earth.
What is the difference between balanced and unbalanced cable?
Balanced cable uses two signal conductors and a shield and can reject interference along the run, provided the equipment at both ends supports balanced connections. Unbalanced RCA or TS-jack cabling is best kept to short links.
When is a 100-volt speaker line a good choice?
When many speakers are distributed over long distances, as in restaurants, hotels, shops and common areas. For a few speakers near an amplifier, or high-powered live music systems, low-impedance distribution is more typical.
What cable size do speakers need?
It depends on power, cable length and system type. A 100 V line may only need 1.5 mm² for standard commercial distances and 2.5 mm² for longer runs. Low-impedance 4–8 ohm systems carry considerably more current and may need heavier cables to avoid power loss and reduced driver control.
Can an audio rack be built into an enclosed cabinet?
Yes, provided each manufacturer's airflow requirements are met and the cabinet has suitable intake and exhaust ventilation, or forced-air cooling. An unventilated rack shortens the service life of amplifiers and processors.
08 · FIXED INSTALLATIONS
Conclusion: professional audio cabling without unpleasant surprises
A poorly executed professional audio cabling installation in Málaga A well-designed installation is practically invisible: the sound works, nobody complains and maintenance is straightforward. Problems begin when routes are improvised, incompatible standards are mixed or documentation is postponed.
If you are planning a sound installation for your venue or need to investigate an existing system with problems, at RinconRock we can assess it without obligation. We have more than fifteen years of experience in sound installations in Málaga and on the Costa del Sol, are registered industrial installers in Andalusia and are authorised to install sound limiter-recorders. Our technical team has a fully equipped workshop for electronics, welding and machining, enabling quick responses and the fabrication of bespoke brackets, racks or components for each venue.
Contact us and tell us about your project.
RINCONROCK RENTAL AV · RELATED RESOURCES
FIXED INSTALLATIONS
A poorly executed professional audio cabling installation in Málaga may look fine on opening day. The problems appear three months later, when an impossible-to-eliminate hum develops, no one understands the audio rack, or an underspecified 100-volt line leaves the furthest speakers barely audible. Fixing it then means dismantling equipment, pulling new cables and paying for work that was never budgeted.
This guide is for venue owners, installers, architects and construction or maintenance managers who want to get the job right from the start. It avoids unnecessary jargon without overlooking the essentials.
6 STEPS
FROM ROUTING TO DOCUMENTATION
100 V
DISTRIBUTED PA SPEAKER LINE
≈80 %
RECOMMENDED MAXIMUM AMPLIFIER LOAD
01 · FIXED INSTALLATIONS
1. Step 1: plan your cable routes before pulling any cable
The most common and expensive mistake in any commercial sound installation is improvising cable routes as the job progresses.
Before chasing walls or installing trunking, decide:
- Where the audio rack will be located (ideally somewhere central, accessible and ventilated)
- How many sound zones the premises will have, and whether they need independent control (which determines whether a single amplifier is sufficient or whether a multi-zone amplifier or DSP processoris needed)
- Which distribution system you will use: conventional audio signals or a 100-volt speaker line
- Where the loudspeakers will go, along with microphone connections and audio inputs
- Where conduits and cable runs will pass, keeping signal, speaker and mains cables separate from the outset
- How the rack will be powered: a dedicated circuit from the distribution board, with appropriate protection, is recommended
- Whether the venue requires a sound limiter-recorder under its licence: it must be integrated into the rack's signal chain so that all playback passes through it
With this plan in place, cabling design becomes straightforward. Without it, every improvised decision can create future problems.
02 · FIXED INSTALLATIONS
2. Step 2: choose balanced or unbalanced audio cabling correctly
This is an area where a lack of understanding causes many mistakes.
Professional balanced audio cabling (two signal conductors plus shield, with XLR or TRS jack connectors or wired directly to terminals) is standard in professional fixed installations for a very specific reason: it rejects electromagnetic interference picked up along the cable run. Noise reaching both conductors equally is cancelled by the balanced input. Both the source output and destination input must be balanced for this to work. In a venue with LED lighting, dimmers or nearby electrical wiring, this is a necessity rather than a luxury.
Unbalanced cabling (RCA or two-conductor TS jack) has its place over short distances between consumer devices. Using it over long runs often leads to hum, noise and interference. When a source only has an unbalanced output, such as a computer or television, convert the signal to balanced close to the source using a DI box or converter.
Practical rule: in a fixed installation, audio signal runs longer than a few metres (around 3–4 m as a guide) should normally be balanced from end to end using good-quality shielded cable. In public-access premises, consider halogen-free, low-smoke cable sheathing consistent with the fire-safety requirements applied to electrical cabling under Spain's Low Voltage Electrotechnical Regulation (REBT).
03 · FIXED INSTALLATIONS
3. Step 3: when to use 100-volt speaker lines and how to size them
The 100-volt speaker line is commonly used for distributed public-address installations with many loudspeakers: cafés, restaurants, hotels, shops and building common areas.
Its advantage is straightforward: transmitting power at higher voltage and lower current allows multiple speakers to be connected in parallel over long cable runs with less loss than a conventional low-impedance (4–8 ohm) system.
However, it must be designed correctly:
- Each speaker needs a line transformer with the correct power tap selected
- As good practice, the total power-tap rating of all speakers should not exceed approximately 80% of the amplifier's rated output, leaving headroom for transformer tolerances and cable losses
- Cable cross-section depends on power and run length: 1.5 mm² is often sufficient for normal commercial runs, while 2.5 mm² may be appropriate for longer runs or heavier loads
- 100-volt line cables must be separated from low-level signal cables (microphones, consoles) to minimise interference
- A 100-volt line operates at 100 V RMS, with higher peaks: make joints in suitable junction boxes using protected terminals, never exposed conductors
Mixing systems without understanding them—such as connecting a low-impedance speaker without a transformer to a 100 V output—is a frequent cause of damage and poor performance in hospitality installations.
04 · FIXED INSTALLATIONS
4. Step 4: organise, protect and ventilate the audio rack from day one
A well-organised audio rack makes the difference between an installation anyone can maintain and a maze only its original installer understands.
Basic good practice:
- Label every cable before connecting it, not afterwards
- Use patch panels to make connections accessible without moving equipment
- Respect the ventilation requirements specified by each manufacturer. Many amplifiers draw air in through the front and exhaust it at the rear, so airflow must remain unobstructed. A rack built into a closed cabinet may need forced ventilation. Excessive heat is a common cause of power amplifier failures
- Run mains power cables along one side of the rack and signal cables along the other; if they cross, do so at right angles
- Protect equipment against surges (at the electrical board and, where appropriate, with protected rack power distribution and sequenced power-up), and add a UPS where the system is critical, such as a PA system or networked DSP
A disorganised rack not only complicates servicing; it creates technical problems that can be difficult to diagnose.
Regulations: Electrical components of the installation—including rack power circuits, breakers, RCDs, earthing and cable routes—must comply with Spain's Low Voltage Electrotechnical Regulation (REBT) and be installed by an appropriately authorised electrical contractor.
05 · FIXED INSTALLATIONS
5. Step 5: prevent ground-loop hum at the design stage
Professional Ground-loop hum (the persistent low-frequency 50 Hz buzz and its harmonics) is one of the most common and frustrating problems in fixed audio installations, often becoming noticeable at the worst possible moment.
The most common cause is a ground loop: a difference in electrical potential between equipment grounds that drives current through the shields of connected signal cables. Long unbalanced runs and improperly terminated shields can also contribute.
How to prevent it during design:
- All equipment in the rack should share the same protective earth reference and ideally be powered from the same circuit
- Use Audio isolation transformers on problem inputs such as computers, televisions connected to aerial systems and external players
- In larger installations, consider a star-grounding arrangement where equipment grounds converge at a common point rather than being daisy-chained
Safety first: never defeat the protective earth on a device (for example by removing the earth pin or using an unearthed adapter) to eliminate hum. This creates a serious electrical hazard and conflicts with electrical safety rules. Address the audio signal instead, using an isolation transformer, an appropriate ground lift on a DI box or audio device, or a correctly engineered one-end shield termination for a balanced connection.
Troubleshooting ground noise after an installation is finished can take hours. Prevention is worth the effort.
06 · FIXED INSTALLATIONS
6. Step 6: document the installation
This step is omitted far too often, and it is the one people miss most when repairs or modifications are needed a year later.
The minimum documentation for a commercial sound installation should include:
- Cable route drawings with each line clearly identified
- An equipment list with models, serial numbers and settings
- Connection diagrams for the audio rack
- DSP processor settings (equalisation, limits and zone delays), with backup copies of configuration files
Documentation is part of the project, not an optional extra. Without it, the installation is not finished.
07 · FIXED INSTALLATIONS
7. Frequently asked questions about professional audio cabling
Why is there a hum in my venue's sound system?
In many cases it is ground-loop noise caused by equipment with different earth references or long unbalanced signal runs. Resolve it by using a common supply where appropriate, balanced connections and audio isolation transformers. Never remove an equipment safety earth.
What is the difference between balanced and unbalanced cable?
Balanced cable uses two signal conductors and a shield and can reject interference along the run, provided the equipment at both ends supports balanced connections. Unbalanced RCA or TS-jack cabling is best kept to short links.
When is a 100-volt speaker line a good choice?
When many speakers are distributed over long distances, as in restaurants, hotels, shops and common areas. For a few speakers near an amplifier, or high-powered live music systems, low-impedance distribution is more typical.
What cable size do speakers need?
It depends on power, cable length and system type. A 100 V line may only need 1.5 mm² for standard commercial distances and 2.5 mm² for longer runs. Low-impedance 4–8 ohm systems carry considerably more current and may need heavier cables to avoid power loss and reduced driver control.
Can an audio rack be built into an enclosed cabinet?
Yes, provided each manufacturer's airflow requirements are met and the cabinet has suitable intake and exhaust ventilation, or forced-air cooling. An unventilated rack shortens the service life of amplifiers and processors.
08 · FIXED INSTALLATIONS
Conclusion: professional audio cabling without unpleasant surprises
A poorly executed professional audio cabling installation in Málaga A well-designed installation is practically invisible: the sound works, nobody complains and maintenance is straightforward. Problems begin when routes are improvised, incompatible standards are mixed or documentation is postponed.
If you are planning a sound installation for your venue or need to investigate an existing system with problems, at RinconRock we can assess it without obligation. We have more than fifteen years of experience in sound installations in Málaga and on the Costa del Sol, are registered industrial installers in Andalusia and are authorised to install sound limiter-recorders. Our technical team has a fully equipped workshop for electronics, welding and machining, enabling quick responses and the fabrication of bespoke brackets, racks or components for each venue.
Contact us and tell us about your project.
RINCONROCK RENTAL AV · RELATED RESOURCES
Professional Audio Cabling Installation in Málaga: Best Practices and Costly Mistakes